Tutorials

Painting TMNT: Koya
Dedicated Lieutenant of the Foot Clan, Koya has unswerving loyalty to her master Shredder. Koya was one of the many Kickstarter extras that came with the TMNT City Fall pledge, but she was one that almost wasn't going to happen and was instead brought in as a bonus because so many fans demanded her inclusion. So, how did I paint this one... let's find out.

Painting TMNT: Wyrm
Wyrm was a surprise, appearing as one of the final stretch goals in the City Fall Kickstarter. No one was expecting him, he's a fringe character, a creature composed entirely of sentient flatworms with a distaste for humans, still it's an interesting sculpt that I was intrigued to get my brushes on. Here's how I painted TMNT's Wyrm...

Painting TMNT: Pidgeon Pete
It's a new year and time to write some new articles so I'm kicking things off with a how to paint for one of the most iconic characters from IDW TMNT adventures line, Pigeon Pete. In this case Pete has become somewhat of a mascot for the game acting as an alter ego for designers and developer Pete Walsh. Here's how I got started.

Baking Bases
Today we'll be building some custom dungeon bases for Descent. For this we're using MDF bases from Sarissa Precision, these bases are 3mm thick and hold up well to both the baking process as well paint and glue. For the sculpting putty we're using Super Sculpey. Finally we're using the excellent rollers from Green Stuff World to add the detail.

Painting Cave Trolls
After a quick trip home last weekend I managed to grab some of my old Lord of the Rings models. These were painted back when the films first came out in 2001 and I have improved a lot since then. So armed with new techniques and new paints I decided to repaint my old cave trolls and see if I could bring them up to my current standard.

Painting Invader: Xenomoths
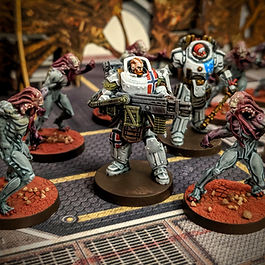
Today we're taking a look at how I painted my Xenomoths for #ZombicideInvader. I'll be using a technique known as wet blending. The aim here is to keep your paints as wet as possible and blend them together on the mini to create a more realistic transition between colours.

Painting Invader: Flingers
Of all the extra Xeno types in the #ZombicideInvader kickstarter I was probably most looking forward to painting the Flingers. These ranged Xenos pose a unique problem of where you end your turn as they can be quite deadly being able to shoot up to three zones away. Anyway, I finally got around to painting them I and I thought I would share how I did it.

Painting Invader: Hunters
This week we're going to be taking a look at how I speed painted my Hunters for #CoolMiniOrNot's #ZombicideInvader. The Hunters are fast, activating twice at the end of each round and easily underestimated in large groups especially as they fall last in the targeting priority.

Painting Invader: Workers
Hey guys, this week I thought I'd give you a quick breakdown of how I painted the Xeno Wokers for Zombicide Invader. With so many minis in the box I needed to find a quick way of giving them a great presence on the table without spending forever painting. In the end I got the technique down to just 20 minutes per miniature.


